Goal
In this activity, you will implement an edge detection filter using a 3×3 convolution kernel.
You will:
load an image from a file
convert it to grayscale
apply an edge detection kernel using for-loops and NumPy
threshold the result to a binary black-and-white image
display and save your output
There is no test for this activity. You will show your output images to get checked off.
Requirements
You must:
Convert the image to grayscale before edge detection
Use a 3×3 edge detection kernel (you must look up an appropriate kernel)
Perform the convolution using nested for-loops and NumPy slicing
Produce an output image that contains only 0 or 255
Do not modify the original image array in-place.
Your final image must be displayable and saved to a file.
Step-by-Step Tasks
1) Implement edge_detect(filename)
Write a function called:
edge_detect(filename: str) -> None:This function should:
accept the filename of a JPEG image
load the image into a NumPy array
display the final processed image
save the output image to a file
2) Convert the image to grayscale
Before applying edge detection, convert the color image to grayscale.
Hints:
The input image will have shape
(height, width, 3)A grayscale image has shape
(height, width)Grayscale values are typically computed from the R, G, and B channels together
There is more than one valid grayscale formula — choose one and be consistent
At the end of this step, you should be working with a single-channel image.
3) Choose a 3×3 edge detection kernel
Look up a 3×3 edge detection kernel.
Hints:
Search for kernels such as Laplacian, Sobel, or Prewitt
Some kernels detect edges in a specific direction
Write a short comment explaining which kernel you chose and why
You should store your kernel as a 3×3 NumPy array.
4) Apply the kernel using convolution
Apply your kernel to the grayscale image using convolution.
Hints:
For each pixel (except the borders):
extract a 3×3 window of the image
multiply it element-wise by the kernel
sum the result to get the new pixel value
Use:
nested
forloops for row and column traversalNumPy slicing to extract the 3×3 window
Store results in a new output array, not the input image
Border handling hint:
You may skip the outermost pixels to keep things simple
Optimally - you can use np.pad to add a border to keep the image sizes equivalent
5) Prepare the result for display
Convolution can produce values that are negative or larger than 255.
Hints:
Think about what the magnitude of an edge represents
Decide how to convert your convolution output into something that can be displayed
You may find it useful to use absolute values or clipping
6) Threshold to a binary (0 / 255) image
Convert your processed image into a black-and-white image:
values greater than 127 → 255
values 127 or below → 0
Your final image should contain only two values.
7) Display and save the result
Display your black-and-white edge image
Save it to a file (PNG recommended)
Make sure the saved image opens correctly.
Optional Extension
Experiment with a different kernel and compare results
Try applying the kernel before thresholding and visualizing the intermediate result
Consider how border handling affects the output
Check-off
Raise your Paddlepop when:
your image is successfully edge-detected
your output is black-and-white (0 or 255 only)
your image is displayed and saved
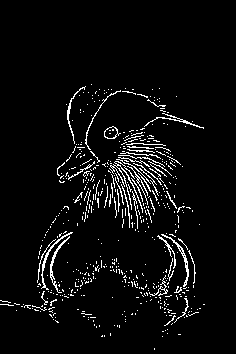
Your ouptut image should look something like the following:
import imageio
import matplotlib.pyplot as plt
import numpy as np

# Write your function here!
def edge_detect(image_file: str) -> None:
    # Define the kernel

    # Apply the kernel

    # Normalize the image

    ...


edge_detect("duck.jpg")